Sick Day Survival Crafts: Painting

Sick Day Survivors Log: Day 5
After four consecutive days of excess screen time and couch naps thanks to a 102 to 104 fever, a new fever has set in. I’m thrilled my little guy is starting to feel better, but cabin fever has taken over. There’s not much hope as we are essentially in quarantine for 3 more days. Three. Days. It might not sound like much, but this is three days of being home bound on top of the four days we already spent stuck lolling about the house.
It started with a fever Wednesday night. When Friday rolled around, we had to make the call. It hadn’t been 72 hours yet, so going to the doctor would likely be pointless. We decided to wait it out through the weekend and, if needed, make an appointment on Monday.
We didn’t make it to Monday. Instead, we ended up in the ER on Sunday evening. We were sent home with some prescription meds and a note that read “Infectious. Rest at home for 3 days.”
Welp, no summer camp this week. Thankfully they agreed to a full refund without an issue, but now it’s time for summer camp at home. For a full week. While I make a sad and desperate attempt to try to squeeze in a few hours of work. Let the train wreck begin.
Painting Marathon
I hadn’t prepared to have activities at home for a week. Saturday night, I was so sure the fever had passed. About half way through Sunday, it was clear that the joke as on me. When Monday rolled around, the meds seemed to be kicking in, but that now meant I had a more energetic, housebound 5 year old. So I turned to the first craft material that came to mind. One that we have in abundance. Paint.
Over the course of a couple hours, we painted 3 canvases, three different ways. We used a mix of acrylic and tempura paint. The results were some super cute paintings that we will be finding wall space for soon.
Geometric Paint Mosaic
Materials:
- Canvas
- Acrylic Paint
- Painters tape or Washi Tape
- Paint brushes
- Paper Plates (for paint palettes)
I can’t claim this as an original thought. I’ve seen this done a million different ways on canvases and walls. It’s an easy way to help a child make a beautiful piece of art, because there’s really no way to do it wrong.
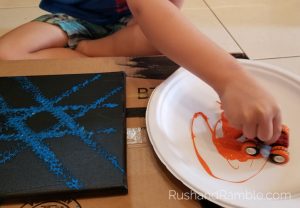
First we picked a background color. This color will end up being the lines in your mosaic. The only real rule here is you will want to make sure it contrasts with your other colors. We picked gold. Black, white and silver are some other great options. If you choose to use white, you should still paint the canvas white. Leaving a canvas bare is basically creating a dirt and dust magnet. Whatever color you choose, paint the entire canvas with this color then set it aside to dry.
Once your background paint is completely dry, use painters tape or washi tape to make your lines. I used painters tape and cut it in half to make narrower strips.
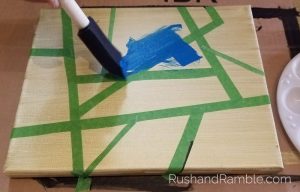
Let your kid put the tape in any direction they choose. The only intervention I recommend is trimming up the ends of the tape to make sure each piece dead ends into another piece of tape. If you have younger kids, you can do this step for them.
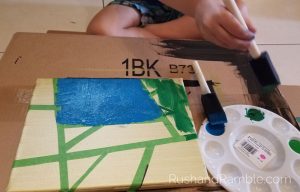
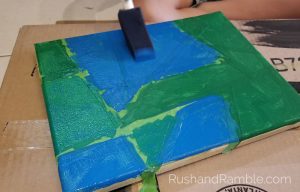
Now, paint! You can swirl colors all over over or you can paint each segment a different color to practice painting inside the lines. Either way, the main point is to have fun!
If your kid is more of a “mix all the colors” sort, you can still set them up to make a painting that isn’t a muddled brown mess. Ask them to pick one color, then help them pick colors that will blend well.
Examples:
If your kid picks red, ask them if they would like to use orange and yellow or blue and purple to go with it.
If they pick green, ask them if they would like to use yellow or blue or both.
Road Race Wheel Painting
Materials:
- Canvas
- Black acrylic paint
- Tempura paint
- Toy with wheels (Lego car, hot wheels, monster trucks, etc)
- Paper plates (for paint palettes)

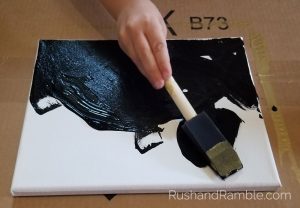
For this painting, we started by painting the canvas black, like a road. Black also works well to help vibrant colors pop against the background.
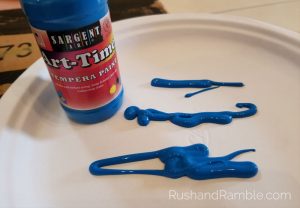
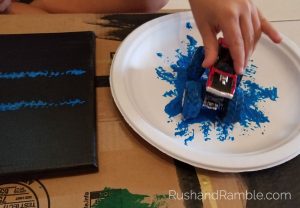
After the background color has completely dried, we used two paper plates as paint palettes. If you are using multiple colors for tire tracks, be sure to use one plate for each paint color. This keeps the colors from becoming muddled before they are driven onto the canvas. Start with a small amount of paint, but spread it around the plate so the tires can be completely coated when your kiddo “drives” their cars and trucks over the paint.
For our painting, we used one set of Lego tires and a Hot Wheels monster truck. I think the tires had fun textures and worked really well.
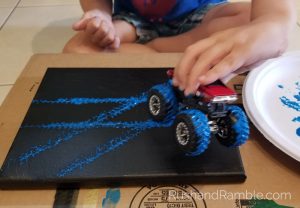
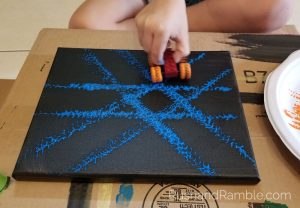
Once the tires are coated, the cars can drive across the canvas. For best results, you’ll want to roll the car across the canvas once. This gives a nice, thick coat of paint and keeps the texture of the tire tracks. Zooming back and forth across the canvas is also a super fun option, but you may lose the textured look from your tire tracks.
Repeat this process with each color as many times as you’d like. When you are done, rinse off your car tires with water. If you have an old toothbrush or scrub brush, these work really well for getting into the grooves of the tires.
Daubers, Fingers, Brushes and Totoro
Materials:
- Canvas board
- Painters tape
- X-Acto knife
- Paint daubers
- Acrylic paint
- Sea sponge (a wadded up plastic bag will also work)
- Paint brush
- Paper plate (for paint a palette)
While this is still a painting, it boarders on process art. There are a few different steps and multiple techniques for putting paint on canvas, making it a fun, exploratory art project.
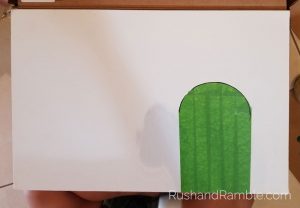
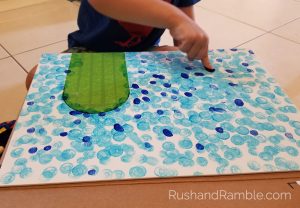
Before any painting starts, use your painters tape (I prefer Frog Tape) to block off a rectangle of canvas. Overlap the strips of tape to ensure you don’t have any gaps where paint can get through to the canvas.
Using something round, trace a semi circle at the top of the tape column. It doesn’t matter what you use, just make sure it has a diameter that is equal to or larger than the width of your tape column. I used the roll of tape itself.
Using the X-Acto knife, carefully cut the tape on the semicircle line you just traced. Peel off the excess tape. Be sure to err on the side of not cutting deep enough. You can always go back and cut through the tape a second time. But, if you press to hard, you could end up cutting a deep gash into the canvas.
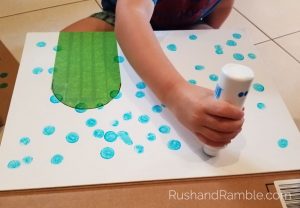
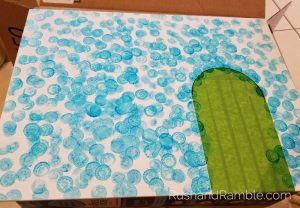
Now, for the painting. First we used blue Do-A-Dot paint daubers. We dotted nearly the entire canvas at random, leaving very little white space. This made a nice rainy background.
Next, using a much deeper shade of blue, we made finger print raindrops. To do this, we poured paint onto a paper plate then soaked it up into a sponge brush. This works a lot like a stamp pad and helps prevent excess paint globs on little fingers.

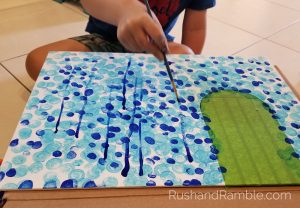
After the finger print rain drops, we used a paint brush to make vertical lines. These gave our falling rain drops some motion. We used the same blue as the finger prints, but you could mix up the colors if you want. When painting rain lines, I recommend painting from the bottom up. Where the brush first touches the canvas, the paint will be thicker. As the paintbrush moves up the canvas, the line will naturally get a bit lighter as the paint runs out, making nice, long, falling raindrops.
Once the three layers of rain are finished, set the canvas aside to dry completely. The final step is to paint rain clouds and you want the clouds to sit on top of the blue rain paint, not mix with it.
To make the rain clouds, I put white, pearl white, and silver on a paper plate. Then we dabbed the paint with a wadded up plastic bag. A sea sponge works best for this, but I couldn’t find mine, so we used a plastic bag instead. Because we were using a plastic bag, it took a couple layers of paint to really cover up the blue paint.
Set the canvas aside to dry. Once the paint is mostly dry, peel off the painters tape. You should have crisp, white canvas. If any paint bled under the tape, you can carefully touch it up with white paint.

Paint on an umbrella at the top and add a person or character. You could paint the canvas and then let your child add a person or character. We wanted to add Totoro, so I painted him on myself.
I am absolutely in love with the final painting and it was a really fun collaborative piece for me and my son to work on together.
What do you do on sick days?
Despite being sick, it was a fun day filled with colorful messes. After our last painting, we were both ready for a break and returned to reading books and watching TV.
How do you pass the time when your kids are home sick?
